

Looking to charge your magnets and enhance their magnetic power? You’ve come to the right place! In this article, we’ll show you how to make a magnet charger so you can easily recharge your magnets and harness their full potential. Whether you need stronger magnets for a science project, DIY crafts, or any other application, this simple and straightforward DIY magnet charger will do the trick. So, let’s dive in and learn how to make a magnet charger that will supercharge your magnets in no time!

How to Make a Magnet Charger: A Step-by-Step Guide
Are you interested in exploring the fascinating world of magnets and their potential applications? Creating a magnet charger is a great way to experiment with magnetism and learn more about how it works. In this comprehensive guide, we will walk you through the process of making your own magnet charger, from gathering the necessary materials to testing the final product. Let’s dive in!
Understanding Magnet Chargers
Before we begin, it’s essential to have a clear understanding of what a magnet charger is and how it functions. A magnet charger is a device that generates a strong magnetic field, allowing you to magnetize or demagnetize objects. It consists of a power supply, coil, and a core made from ferromagnetic material like iron or steel.
The coil, often referred to as a solenoid, is responsible for producing a magnetic field when an electric current passes through it. The core material enhances and concentrates this magnetic field, making it more effective at magnetizing or demagnetizing objects.
Materials You Will Need
To create your own magnet charger, gather the following materials:
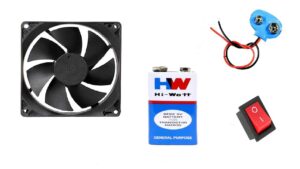
1. Copper wire: 18-gauge or similar
2. Ferromagnetic core: Iron or steel rod
3. Power supply: DC power supply or battery pack
4. Electrical tape
5. Wire strippers
6. Safety goggles
7. Gloves
Step 1: Prepare the Core
Begin by preparing the ferromagnetic core. If you have chosen a rod, ensure it is clean and free from any rust or debris. If necessary, use sandpaper or a wire brush to remove any contaminants. Remember, a clean core will optimize the magnetic field produced by your magnet charger.
Step 2: Creating the Coil
1. Measure and cut the copper wire: Determine how many windings you would like in your coil. The more windings, the stronger the magnetic field will be. Cut a length of copper wire that is sufficient for your desired number of windings. Leave a few extra inches on each end to connect the coil to the power supply.
2. Insulate the wire: To prevent short circuits, it’s crucial to insulate the wire. Run the wire through a piece of electrical tape, covering its entire length. This will ensure that the wire does not come into direct contact with the core or other components.
3. Wind the coil: Start winding the wire around the ferromagnetic core, making sure each loop is tightly wound next to the previous one. Take your time and maintain a consistent distance between each winding.
4. Secure the coil: Once you have completed the desired number of windings, use electrical tape to secure the ends of the wire to the core. This will maintain the integrity of the coil and prevent it from unraveling.
Step 3: Connecting the Coil to the Power Supply
1. Strip the wire ends: Using wire strippers, carefully strip the insulation from the ends of the wire. Take caution not to damage the wire itself during this process.
2. Connect the coil to the power supply: Connect one end of the wire to the positive terminal of the power supply or battery pack. Connect the other end to the negative terminal. Ensure the connections are secure.
3. Safety precautions: Before powering on the magnet charger, put on your safety goggles and gloves. It’s essential to protect your eyes and hands from any potential hazards during operation.
Step 4: Testing the Magnet Charger
1. Power on the charger: Turn on the power supply or activate the battery pack. Electricity will flow through the coil, generating a magnetic field.
2. Testing a magnet: Hold a small magnet near the coil and observe if it becomes magnetized. A successful magnet charger will impart magnetism onto the object when held close to the coil.
3. Testing demagnetization: Alternatively, if you have a magnetized object, hold it near the coil and observe if it becomes demagnetized. A properly functioning magnet charger will remove the magnetism from the object when placed near the coil.
Safety Considerations
While working with electricity and magnets, it’s crucial to prioritize safety. Here are a few safety considerations to keep in mind:
1. Always wear safety goggles and gloves to protect your eyes and hands.
2. Be cautious when handling sharp tools or materials.
3. Do not connect the coil directly to the mains electricity supply, as this can be dangerous. Stick to using a DC power supply or battery pack.
4. Take breaks if you feel fatigued or overwhelmed during the construction process. Your safety is paramount.
Conclusion
Congratulations! You have successfully created your own magnet charger. By following this step-by-step guide, you now have a functional device that can magnetize or demagnetize objects. Remember to use your magnet charger responsibly and explore the countless possibilities of magnetism in various practical applications.
We hope you enjoyed this guide on how to make a magnet charger. Have fun experimenting and discovering the exciting world of magnets!
How To Make a Magnetic USB Charger – MagSafe Charger for Cheap!
Frequently Asked Questions
Question: What materials do I need to make a magnet charger?
Answer: To make a magnet charger, you will need a power source such as a battery or power supply, a copper wire, a soft iron core, an insulated coil, and some basic tools like pliers and a soldering iron.
Question: How do I construct the coil for the magnet charger?
Answer: To construct the coil, start by winding the copper wire around the soft iron core. Make sure to leave enough excess wire on both ends for connections. The number of turns in the coil will depend on the desired strength of the magnet charger.
Question: How do I connect the coil to the power source?
Answer: First, strip the insulation off the ends of the copper wire on the coil. Then, connect one end of the wire to the positive terminal of the power source and the other end to the negative terminal. You can use soldering or secure the connections with electrical tape.
Question: Can I use a different metal core instead of soft iron?
Answer: While soft iron is the most commonly used core material for magnet chargers due to its magnetic properties, you can experiment with other materials like steel or ferrite. However, keep in mind that the performance of the charger may vary depending on the core material used.
Question: Are there any safety precautions I should follow when making a magnet charger?
Answer: Yes, safety is important when working with electrical components. Make sure to disconnect the power source before making any adjustments or connections. Avoid touching exposed wires while the charger is powered on, and be cautious when using the soldering iron to prevent burns.
Final Thoughts
To make a magnet charger, start by gathering the necessary materials: wire, a battery, a switch, and a nail or screw. Begin by wrapping the wire around the nail or screw tightly, leaving a few inches of wire on each end. Connect one end of the wire to the positive terminal of the battery, and the other end to the switch. Attach the negative terminal of the battery to the switch. When the switch is turned on, the current flows through the wire, creating a magnetic field around the nail or screw. This homemade magnet charger is a simple and effective way to create a temporary magnet. Give it a try and see the results for yourself! So, if you’re looking to learn how to make a magnet charger, follow these steps and experiment with magnetism.