Looking to charge the battery on your TTR 110? You’ve come to the right place! In this blog article, we’ll walk you through the simple steps to get your TTR 110 battery charged up and ready to go. No need to worry about the technical jargon or complicated procedures – we’ll break it down for you in a conversational and easy-to-follow manner. So, whether you’re a seasoned rider or just starting out, let’s dive right into how to charge the battery on your TTR 110.

How to Charge the Battery on TTR 110
Introduction
One of the key components of maintaining a Yamaha TTR 110 is ensuring that the battery is properly charged. A fully charged battery is crucial for powering the engine and electrical systems of your motorcycle. While the process of charging a battery may seem daunting at first, it is actually a simple and straightforward task that you can easily do at home. In this guide, we will walk you through the steps to charge the battery on your TTR 110, providing you with the knowledge and confidence to keep your motorcycle running smoothly.
1. Preparing for Battery Charging
Before you begin charging the battery, it is essential to take a few precautions to ensure your safety and protect the motorcycle’s electrical system. Follow these steps before proceeding with the charging process:
- Ensure that the TTR 110 is parked on a flat surface in a well-ventilated area.
- Switch off the motorcycle’s ignition and remove the key from the ignition slot.
- Inspect the battery for any signs of damage, leaks, or corrosion. If you notice any issues, consult a professional technician before proceeding further.
- Wear appropriate protective gear, including safety glasses and gloves, to protect yourself from any potential accidents or spills.
2. Accessing the Battery
To charge the battery on your TTR 110, you need to locate it first. Follow these steps to access the battery:
- Locate the battery compartment on your TTR 110. In most cases, the battery is situated beneath the seat.
- Remove any seat locks, bolts, or straps that secure the seat in place.
- Lift the seat carefully, ensuring not to damage any wires or cables connected to it.
- Once the seat is lifted, you should have clear access to the battery compartment.
3. Removing the Battery
Before you can charge the battery, you need to disconnect it from the motorcycle. Follow these steps to remove the battery from your TTR 110:
- Identify the two terminals on the battery: the positive terminal (marked with a plus “+”) and the negative terminal (marked with a minus “-“).
- Using a socket wrench or a suitable tool, loosen and remove the bolts or connectors that secure the battery cables to the terminals.
- Start with the negative terminal and disconnect it first to minimize the risk of short circuits.
- Once the negative terminal is disconnected, move on to the positive terminal and remove it as well.
- Gently lift the battery out of the compartment, taking care not to drop or damage it.
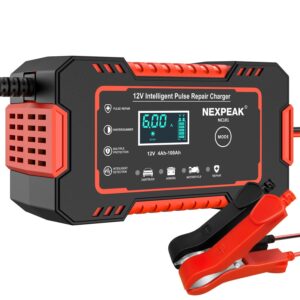
4. Choosing a Battery Charger
Selecting the right battery charger is crucial to ensure efficient and safe charging. Consider the following factors when choosing a battery charger for your TTR 110:
- Choose a charger specifically designed for motorcycle batteries.
- Opt for a charger that matches the voltage and capacity of your TTR 110 battery. Check the owner’s manual or battery specifications for this information.
- Look for chargers with safety features such as overload protection, short circuit prevention, and automatic shut-off when the battery is fully charged.
5. Connecting the Battery Charger
Once you have the appropriate battery charger, it’s time to connect it to your TTR 110 battery. Follow these steps:
- Read the instructions provided by the battery charger manufacturer to familiarize yourself with its specific operation and safety guidelines.
- Identify the positive and negative terminals on the battery charger. They are usually color-coded (red for positive and black for negative).
- Connect the positive terminal of the battery charger to the positive terminal of the battery.
- Similarly, connect the negative terminal of the battery charger to the negative terminal of the battery.
- Ensure that the connections are secure and tight to avoid any accidental disconnection during the charging process.
6. Charging the Battery
With the battery charger properly connected, it’s time to initiate the charging process. Follow these steps to charge the battery on your TTR 110:
- Refer to the instructions provided by the battery charger manufacturer for the recommended charging settings.
- Set the charging mode according to the manufacturer’s recommendations and adjust the charging rate if applicable.
- Switch on the battery charger and allow it to charge the battery. The charger may indicate the progress of the charging process.
- Monitor the charging process periodically and ensure that the battery does not overheat. If you notice any signs of overheating or other abnormalities, immediately disconnect the charger and consult a professional technician.
- Once the battery is fully charged, the charger may automatically shut off or indicate that the charging process is complete. If not, refer to the manufacturer’s instructions to determine the correct charging duration and proceed accordingly.
7. Reinstalling the Battery
After the battery is fully charged, it’s time to reinstall it into your TTR 110. Follow these steps:
- Carefully place the battery back into the compartment, ensuring that the positive and negative terminals align with their respective connectors.
- Reconnect the positive terminal first by tightening the bolt or connector securely.
- Move on to the negative terminal and reconnect it as well.
- Double-check all connections to ensure they are tight and secure.
8. Testing the Battery
To ensure that the battery is functioning correctly after charging, perform a simple test. Follow these steps:
- Switch on the motorcycle’s ignition and check if the electrical systems power up without any issues.
- If the motorcycle starts effortlessly and the lights, horn, and other electrical components work properly, it indicates that the battery is in good condition.
- If you encounter any problems or the battery fails to hold a charge, it may be a sign of a faulty battery or another underlying issue. Consult a professional technician for further assistance.
Charging the battery on your TTR 110 is a simple process that requires a few precautions and the right equipment. By following the steps outlined in this guide, you’ll be able to keep your battery in optimal condition, ensuring a reliable power source for your motorcycle. Remember to always prioritize your safety and consult a professional technician if you encounter any difficulties or suspect battery-related issues. With proper care and maintenance, your TTR 110 battery will provide you with long-lasting performance and enjoyable rides.
Frequently Asked Questions
How do I charge the battery on my TTR 110?
To charge the battery on your TTR 110, follow these steps:
What type of charger should I use for the TTR 110 battery?
You should use a standard 12-volt battery charger compatible with lead-acid batteries. Make sure the charger is in good condition and suitable for motorcycle batteries.
Where is the battery located on the TTR 110?
The battery on the TTR 110 is located beneath the seat. To access it, remove the seat by unscrewing the bolts on either side and carefully lifting it off.
Do I need to disconnect the battery from the TTR 110 before charging?
It is recommended to disconnect the battery from the TTR 110 before charging to ensure a safe and efficient charging process. To disconnect the battery, remove the negative (-) terminal first, followed by the positive (+) terminal.
How long does it take to fully charge the TTR 110 battery?
The charging time for the TTR 110 battery may vary depending on its current state of charge and the charger’s specifications. On average, it takes approximately 4-6 hours to fully charge a depleted battery.
Can I use a car battery charger to charge the TTR 110 battery?
No, it is not recommended to use a car battery charger to charge the TTR 110 battery. Car battery chargers are designed for larger batteries and may deliver too much voltage or current, which could damage the TTR 110 battery.
Final Thoughts
To charge the battery on TTR 110, start by turning off the bike and locating the battery compartment. Remove the battery cover and connect the charger’s positive (+) and negative (-) terminals to the corresponding battery terminals. Ensure that the charger is set to the correct voltage and then plug it into a power source. Let the battery charge for the recommended time, ensuring that it doesn’t overcharge. Once fully charged, disconnect the charger, replace the battery cover, and your TTR 110 will be ready for action. Charging the battery on TTR 110 is a straightforward process that ensures optimal performance.