Having trouble figuring out how to charge a AGM battery? Don’t worry, we’ve got you covered! In this article, we will walk you through the step-by-step process of charging an AGM battery, ensuring that you have all the necessary information to get the job done right. Whether you’re a beginner or an experienced DIYer, our comprehensive guide will provide you with the knowledge and confidence to efficiently charge your AGM battery. So, let’s dive in and learn how to charge a AGM battery effectively, shall we?

How to Charge an AGM Battery
AGM (Absorbent Glass Mat) batteries have become increasingly popular in various applications, including automotive, marine, and recreational vehicles. These batteries offer numerous advantages, such as a longer lifespan, deep cycle capabilities, and better performance in extreme temperatures. However, to ensure the longevity and optimal functioning of an AGM battery, it is essential to charge it correctly. In this article, we will explore the step-by-step process of charging an AGM battery, highlighting important considerations and best practices.
1. Safety Precautions
Before you start charging your AGM battery, it is crucial to follow these safety precautions:
- Ensure you are working in a well-ventilated area to prevent the buildup of potentially dangerous gases.
- Wear protective clothing, gloves, and safety goggles to protect yourself from any potential acid splashes or spills.
- Remove any metallic jewelry or watches to minimize the risk of electrical accidents.
- Make sure all electrical connections are secure and insulated to prevent short circuits.
- Keep a fire extinguisher nearby in case of emergencies.
2. Gather the Necessary Equipment
To charge an AGM battery, you will need the following equipment:
- A compatible AGM battery charger: Ensure that the charger is specifically designed for AGM batteries and has the appropriate voltage and charging capacity.
- A digital multimeter: This tool will help you monitor the battery’s voltage and ensure it is being charged correctly.
- A set of wrenches and/or screwdrivers: These tools may be required to disconnect the battery from its terminals.
- Protective gloves and safety goggles: As mentioned earlier, these will help protect you from any accidents or spills.
3. Disconnect the Battery
Before charging your AGM battery, it is essential to disconnect it from its power source. Follow these steps:
- Turn off the engine or disconnect any devices connected to the battery.
- Identify the positive (+) and negative (-) terminals on the battery.
- Using the appropriate wrench or screwdriver, loosen the bolts or screws securing the cables to the terminals.
- Remove the negative cable first, followed by the positive cable.
4. Choose the Charging Method
There are two common methods for charging AGM batteries: using a dedicated AGM battery charger or a regular battery charger. Let’s explore both options:
4.1 Dedicated AGM Battery Charger
A dedicated AGM battery charger is specifically designed to meet the charging requirements of AGM batteries. It provides a controlled charging process that helps maximize the battery’s lifespan. To use a dedicated AGM battery charger, follow these steps:
- Read the manufacturer’s instructions: Familiarize yourself with the specific instructions provided by the charger’s manufacturer.
- Connect the charger to a power source: Plug the charger into a grounded electrical outlet.
- Select the charging mode: Some AGM battery chargers offer multiple charging modes. Choose the appropriate mode for your battery, usually labeled as “AGM” or “GEL”.
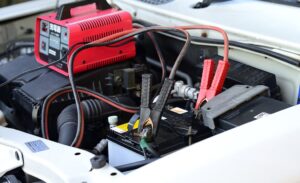
- Connect the charger to the battery: Attach the positive clamp to the positive terminal of the battery and the negative clamp to the negative terminal.
- Initiate the charging process: Follow the instructions provided by the manufacturer to start the charging process.
- Monitor the charging progress: Use a digital multimeter to periodically check the battery’s voltage and ensure it is charging correctly.
- Complete the charging process: Once the battery reaches its full charge, as indicated by the manufacturer’s instructions or the charger’s display, disconnect the charger from the power source.
4.2 Regular Battery Charger
If a dedicated AGM battery charger is not available, you can still charge an AGM battery using a regular battery charger. However, extra caution must be taken to avoid overcharging or damaging the battery. Follow these steps:
- Read the manufacturer’s instructions: Familiarize yourself with the specific instructions provided by the charger’s manufacturer.
- Connect the charger to a power source: Plug the charger into a grounded electrical outlet.
- Select the appropriate charging mode: If your charger offers multiple charging modes, choose the “Trickle” or “Maintenance” mode.
- Connect the charger to the battery: Attach the charger’s positive clamp to the positive terminal of the battery and the negative clamp to the negative terminal.
- Initiate the charging process: Start the charging process according to the manufacturer’s instructions.
- Monitor the charging progress: Use a digital multimeter to periodically check the battery’s voltage and ensure it is charging correctly.
- Stop charging at the right voltage: AGM batteries usually require a slightly higher charging voltage than regular lead-acid batteries. Check the battery manufacturer’s recommendations for the specific voltage to stop charging.
- Disconnect the charger: Once the battery reaches the recommended voltage, disconnect the charger from the power source.
5. Reconnect the Battery
After the AGM battery has been fully charged, it’s time to reconnect it to its terminals. Follow these steps:
- Identify the positive (+) and negative (-) terminals on the battery.
- Place the positive cable back onto the positive terminal and tighten the clamp or screw.
- Repeat the previous step for the negative cable, ensuring a secure connection.
- Double-check the connections: Ensure both cables are tight and properly secured to prevent any loose connections.
6. Test Your Battery
To ensure that your AGM battery is charged correctly and in good working condition, perform a battery test. This can be done using a digital multimeter or a battery tester. Follow the instructions provided with the testing equipment to measure the battery’s voltage and perform other necessary tests. If the battery fails the test or shows signs of damage or deterioration, it may need to be replaced.
By following these steps and taking the necessary precautions, you can effectively charge your AGM battery and prolong its lifespan. Remember to always consult the battery and charger manufacturer’s instructions for specific guidelines and recommendations.
Frequently Asked Questions
How do I charge an AGM battery?
To charge an AGM (Absorbent Glass Mat) battery, follow these steps:
- Ensure that the battery charger is compatible with AGM batteries.
- Connect the red (positive) alligator clip to the positive terminal of the battery.
- Connect the black (negative) alligator clip to the negative terminal of the battery.
- Plug in the charger to a power source.
- Set the charger to the appropriate charging mode for AGM batteries.
- Start the charging process and monitor the battery voltage and charging progress.
- Once the battery is fully charged, disconnect the charger from the power source.
- Remove the alligator clips from the battery terminals, starting with the black (negative) clip first.
Can I use a regular battery charger for an AGM battery?
No, it is not recommended to use a regular battery charger for AGM batteries. AGM batteries require a specific charging profile to ensure optimal charging and prevent damage to the battery. It is best to use a charger specifically designed for AGM batteries or one that has an AGM charging mode.
How long does it take to charge an AGM battery?
The charging time for an AGM battery can vary depending on its capacity, current charge level, and the charger’s output. In general, it may take several hours or more to fully charge an AGM battery. It is important to monitor the charging progress and ensure that the battery is not overcharged, as this can lead to damage.
Can I leave an AGM battery on a charger indefinitely?
While AGM batteries are generally more tolerant of float charging (maintaining a fully charged state), it is not recommended to leave them on a charger indefinitely. Continuous charging can lead to the build-up of excess heat, which can reduce the battery’s lifespan. Once the battery is fully charged, it is best to disconnect it from the charger.
Can I charge an AGM battery in cold temperatures?
Charging an AGM battery in cold temperatures can be a challenge, as cold temperatures can affect the battery’s charging efficiency. It is important to ensure that the battery and charger are kept in a temperature-controlled environment, if possible. Lower temperatures may slow down the charging process, so it is advisable to monitor the charging progress and adjust the charging time accordingly.
Can I jump-start an AGM battery?
Yes, you can jump-start an AGM battery using another vehicle or a jump starter pack. Make sure to follow the standard jump-starting procedure, connecting the positive and negative cables correctly. Once the AGM battery is jump-started, it is recommended to charge it fully using a compatible AGM battery charger to ensure its longevity.
Final Thoughts
To charge an AGM battery effectively, follow these simple steps: First, ensure that you have a compatible charger specifically designed for AGM batteries. Next, connect the charger to the battery terminals, making sure to match the polarity. Set the charger to the correct voltage and charging mode recommended by the battery manufacturer. Then, plug in the charger and allow the battery to charge fully. Monitor the charging process, ensuring that the battery does not overheat. Finally, once the charging is complete, disconnect the charger and securely reattach the battery to its intended device or storage. By following these steps, you can successfully charge an AGM battery and maintain its longevity.