Have you ever wondered how to change a Samsung tablet battery? If you’re tired of dealing with a tablet that constantly runs out of juice, we’ve got the solution for you. In this article, we will guide you through the step-by-step process of replacing the battery in your Samsung tablet, ensuring you never have to worry about your device dying on you again. So, if you’re ready to learn how to change a Samsung tablet battery and take control of your device’s power, keep reading. You won’t want to miss this!

How to Change a Samsung Tablet Battery
Introduction
Samsung tablets are known for their versatility and performance, but even the most reliable devices can experience battery degradation over time. If you find that your Samsung tablet isn’t holding a charge or is draining quickly, it may be time to replace the battery. In this guide, we will walk you through the step-by-step process of changing the battery in your Samsung tablet, ensuring that you can enjoy uninterrupted usage once again.
Table of Contents
- Preparing for Battery Replacement
- Tools and Materials Required
- Removing the Back Cover
- Disconnecting the Old Battery
- Installing the New Battery
- Reassembling the Tablet
- Testing the New Battery
- Conclusion
Preparing for Battery Replacement
Before you start replacing the battery in your Samsung tablet, it’s crucial to take a few preparatory steps. These will help ensure a smooth and successful battery replacement process:
Gather Information
- Identify your tablet model: Samsung tablets come in various models, so it’s essential to know which model you own. You can find this information in the device’s settings or by referring to the tablet’s documentation or online resources.
- Research the battery replacement process: Take the time to read the user manual or search for online tutorials specific to your tablet model. Familiarize yourself with the steps involved and any potential challenges you may encounter.
Create a Workspace
- Find a well-lit, clean, and clutter-free area to work in. A large table or desk will provide ample space to lay out the tools and components.
- Consider using an anti-static mat or wrist strap to prevent electrostatic discharge that could damage sensitive internal components of your tablet.
Backup Your Data
Changing the battery should not affect your data, but it’s always a good idea to create a backup before undertaking any hardware-related tasks. Connect your tablet to a computer and transfer important files and data to a safe location.
Tools and Materials Required
To successfully change the battery in your Samsung tablet, you will need the following tools and materials:
- Replacement battery: Purchase a compatible replacement battery for your tablet model. Make sure to buy from reliable sources to ensure quality and compatibility.
- Small Phillips head screwdriver: Most Samsung tablets use Phillips screws, so having a small Phillips head screwdriver will be essential for removing screws.
- Plastic prying tool or opening picks: These tools help in safely prying off the back cover without damaging the tablet or its components.
- Tweezers: Tweezers are useful for disconnecting connectors and handling small components.
- Adhesive strips or adhesive glue: Depending on your tablet model, you may need adhesive strips or adhesive glue to reattach the back cover securely.
- Cleaning cloth: A soft, lint-free cloth will help clean any dust or fingerprints from the tablet’s screen and back cover.
Removing the Back Cover
Now that you have gathered the necessary tools and prepared your workspace, it’s time to remove the back cover of your Samsung tablet.
Note: The process may vary slightly depending on the tablet model, so consult your tablet’s manual or online resources for specific instructions.
Step 1: Power Off Your Tablet
Before starting any disassembly, ensure your tablet is powered off to prevent any accidental damage or data loss.
Step 2: Locate the Screws and Remove Them
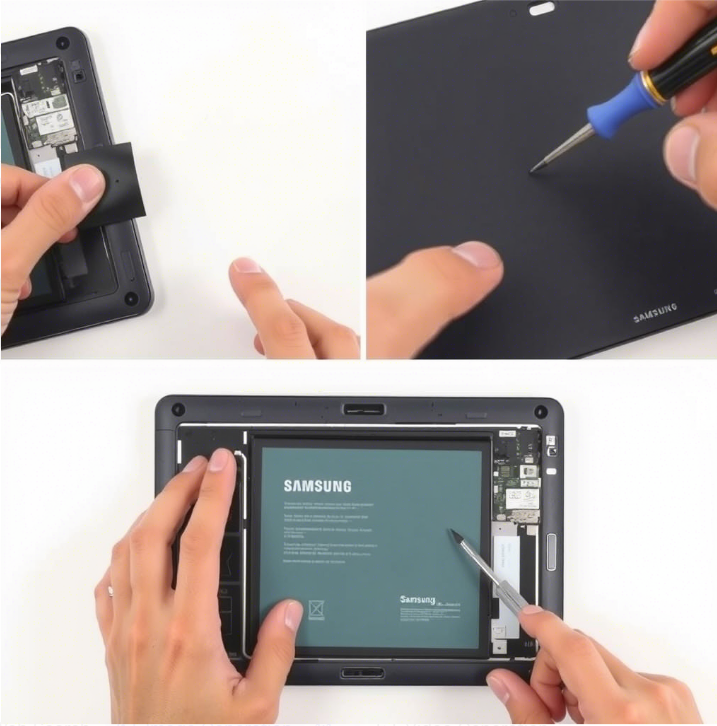
- Using a small Phillips head screwdriver, identify and remove all the screws holding the back cover in place. These screws are usually located around the edges of the tablet.
- Keep the screws organized and in a safe place to avoid misplacing them during reassembly.
Step 3: Pry off the Back Cover
- Insert a plastic prying tool or opening pick into the gap between the back cover and the tablet’s frame.
- Gently apply pressure and move the tool along the edges to release the clips that secure the back cover.
- Work your way around the entire perimeter of the tablet until all the clips are released.
- Once the clips are released, carefully lift off the back cover and set it aside.
Disconnecting the Old Battery
With the back cover removed, you can now proceed to disconnect the old battery from your Samsung tablet.
Step 1: Locate the Battery Connector
- Identify the battery connector, which is a small plug connecting the battery to the tablet’s motherboard.
- Note the position and orientation of the connector to ensure proper reconnection later.
Step 2: Disconnect the Battery Connector
- Using tweezers, gently pull the battery connector straight out of its socket.
- Avoid pulling on the wires or yanking the connector forcefully to prevent any damage.
Step 3: Remove Any Tape or Adhesive
- Check if there is any tape or adhesive securing the battery to the tablet’s frame.
- If present, carefully peel off the tape or adhesive, ensuring not to damage the battery or any surrounding components.
Step 4: Safely Remove the Battery
- With the battery connector disconnected and any adhesive removed, gently lift the old battery out of the tablet.
- Handle the battery with care and avoid bending or puncturing it.
Installing the New Battery
Now that you have removed the old battery, it’s time to install the new one in your Samsung tablet.
Step 1: Position the New Battery
- Take the new battery and position it in the same location as the old battery.
- Ensure that the connectors on the battery align with the corresponding socket on the tablet’s motherboard.
Step 2: Reconnect the Battery Connector
- Line up the battery connector with its socket on the motherboard.
- Gently push the connector straight into the socket until it is firmly seated.
Step 3: Secure the Battery with Adhesive
- If your tablet requires adhesive strips or adhesive glue, follow the manufacturer’s guidelines to securely attach the battery to the tablet’s frame.
- Ensure the adhesive is placed evenly to prevent any movement or rattling of the battery.
Reassembling the Tablet
With the new battery installed, it’s time to reassemble your Samsung tablet.
Step 1: Replace the Back Cover
- Line up the back cover with the edges of the tablet’s frame.
- Press down firmly around the edges to ensure the clips snap back into place.
Step 2: Replace the Screws
- Using the small Phillips head screwdriver, insert and tighten all the screws into their respective positions on the tablet.
- Make sure not to overtighten the screws, as this can damage the tablet’s frame or strip the screw threads.
Testing the New Battery
After reassembling your tablet, it’s important to test the new battery to ensure it’s functioning correctly.
Step 1: Charge the Tablet
- Connect your tablet to a power source using the original charger or a compatible charging cable.
- Allow the tablet to charge for a sufficient amount of time, ensuring the battery reaches a healthy level.
Step 2: Monitor Battery Performance
- Once the tablet is fully charged, unplug it from the power source.
- Use your tablet as you normally would and monitor its battery performance.
- Check if the battery holds a charge for an appropriate duration and if it charges efficiently.
Conclusion
By following this comprehensive guide, you should now have successfully changed the battery in your Samsung tablet. Remember to handle all components with care and consult your tablet’s manual or online resources if you encounter any difficulties. With a new battery installed, you can enjoy extended usage time and a tablet that performs optimally once again.
Frequently Asked Questions
How do I change the battery on my Samsung tablet?
To change the battery on your Samsung tablet, follow these steps:
What tools do I need to change the battery?
You will need the following tools to change the battery on your Samsung tablet:
Can I change the battery on my Samsung tablet myself?
Yes, you can change the battery on your Samsung tablet yourself. However, it is recommended to consult the user manual or seek professional assistance if you are not familiar with the process.
Where can I purchase a replacement battery for my Samsung tablet?
You can purchase a replacement battery for your Samsung tablet from reputable electronics stores, online marketplaces, or directly from Samsung’s official website.
Are there any precautions I should take while changing the battery?
Before changing the battery on your Samsung tablet, make sure to:
Do I need to recalibrate the battery after changing it?
After changing the battery on your Samsung tablet, it is recommended to recalibrate the battery for optimum performance. To do this, simply drain the battery completely, then charge it to 100% without interruption.
Final Thoughts
Changing the battery of a Samsung tablet is a straightforward process that can be done by following a few simple steps. Start by turning off the tablet and ensuring you have the necessary tools, such as a small Phillips screwdriver. Next, carefully remove the back cover and locate the battery. Disconnect the battery connector and remove any adhesive holding it in place. Install the new battery and reassemble the tablet. Finally, turn it on to ensure the battery replacement was successful. By following these steps, you can easily change a Samsung tablet battery at home.

